
Seeing is more than simply detecting light or being able to form images on a film or computer chip. Seeing is about being able to use images to make decisions or draw conclusions. For that to happen, we have to be able to discern shapes and objects in an image. We also must be able to classify the objects that we see as belonging to a group of known things: trees, dogs, cars, and so on. Such a call an object. It has a name (label) and a set of things that we know about it: it is edible, is it an animal, and so on.
A cat is an object. It has a range of visual appearances, but has a set of features that allow us to identify it as a cat. Once we have that label, we can now place it within classes of objects: it is an animal, it is a mammal, it can be a pet, it is among objects we could find in a home, it is a carnivore. How do we visually identify something as a cat? That turns out to be a very hard question. But once we do, we can now abstract it and generalize it. These are among things that artists do.
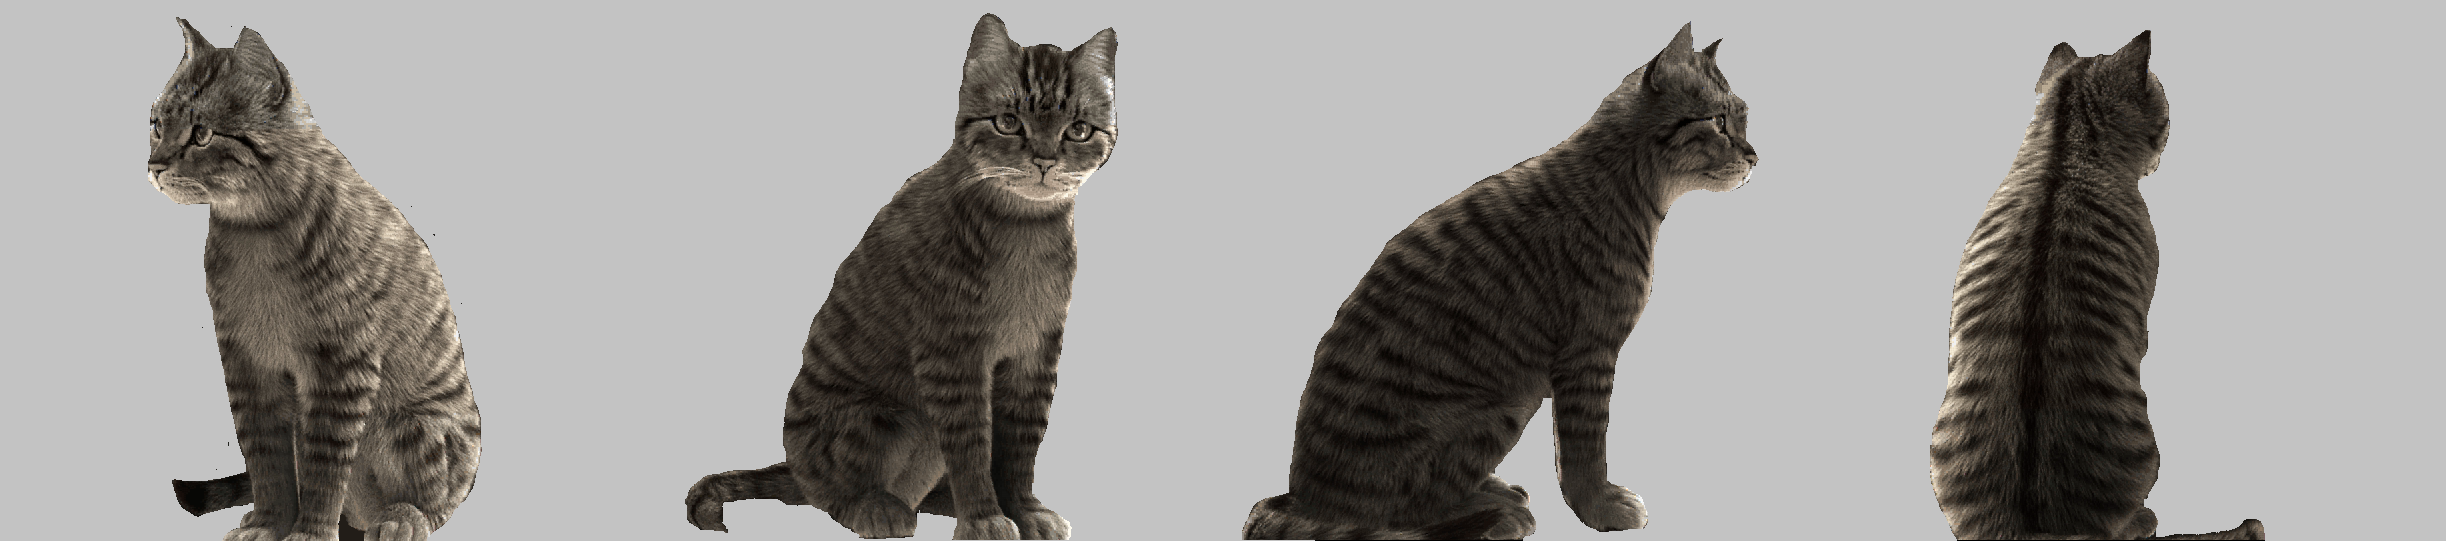
We can only see a cat, or any object, from one side at any moment. Our brain can integrate multiple
views to build a model, in three dimensions, that an artist can use to create an interpretation of the object.
What is interesting is that we can usually discern an object from nearly any point of view. We must have
an internal model of what the object looks like in 3D.
Things that are cats have a set of characteristics that we can think of as ‘cat-ness’, and these allow us to classify the view of the object as a cat and not a car. Cars don't have a high degree of cat-ness.
Artists choose which aspects of an object to represent, which ones to exaggerate, which ones to omit. One might focus on one part of the cat: the face, or a paw. One might abstract the cat, either creating a model cat with few extra features or exaggerate cat shapes or colors. It depends on what the artist wishes to say about the subject. The important thing here is that the artist knows that it is a cat. If that is known, then we only need to see one part of the cat to imagine the rest.
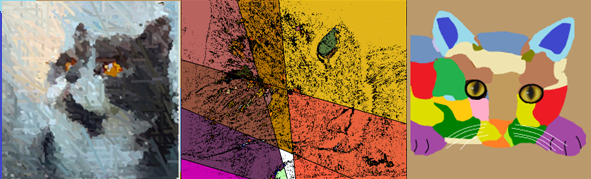
We do not know how to get a computer to recognize a cat. Not really. We don't know how WE do it. Thus, making a computer into an artist is a hard thing to do. Often the very complexity of scene is the interesting aspect of it. It could be the interplay of colors, or the textures, or any number of other values. We still need to know what the individual objects are in the scene if only to ensure that we treat them appropriately. There are very few places where we would portray a cat as being green.
The visual system is only a part of the overall recognition scheme, but is important because it defines the basis of what s possible. The vision system of mammals has a physical, optical portion and a bio-electric sensor and transmission portion, and mammals all have similar vision system. That of reptiles and insect differ. Essentially the eye is like a camera, and it transmits the image to the brain to be processed. Thios is the same basic idea used in computer vision systems, where a camera sends an image to the computer for processing.
The human eye has tiny sensors that detect light, and can detect red, green, and blue in different amounts.
This really means that all colors we percevied are combinations or red, geen, and blue. Dogs have only two sensors,
and other creatures have more (turtles have 5) oe fewer (whales can see only greys).
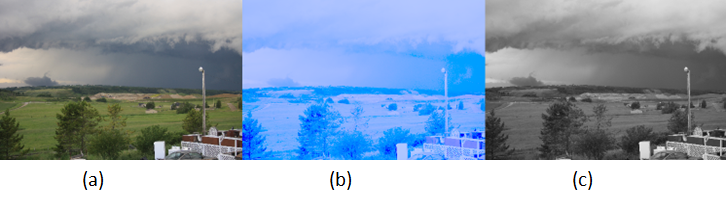
Vision systems respond to light and color in specific ways, and no two are identical. This means that the same color, in terms of RGB value, can seem different to different people. Additionally, the overall brightness can seem to vary between people as well.
All artists begin either with an image, typically one they are looking at, or an idea of an image (an abstraction). We're generative artists, so we're going to use a computer at some point, and we need an image to begin with. A digital camera or web camera captures an image as a two-dimentional array of colors. Each color represents the color seen at that point in the scene, and has red, green, and blue component.
Computers can only deal with numbers, so everything on a computer is represented as a number: data, programs, images, and sounds. So a color must be repesented as numbers too, if we're to use them to make art. What we do is take the red, green, and blue components an assign a numerical value to the amount of each color that is present. Such a number has a smallest amount (=0) and a largest amount (usually 255). Why 255? Because a byte, which is a term I'm sure you have encountered, can have a value between 0 and 255 inclusive. A computer trained person would be pleased that a red component would fit into one byte. A color would consist of three such components, or three bytes. Actually, a color is 4 bytes because there is an additional component, named alpha , but more on that later.
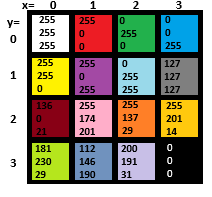
So a color on a computer has a red, green, and blue, and alpha component, each being 4 bytes of computer storage. Each location im an image is a color value. We call each one a pixel, short for picture element. An image consists of rows and columns of pixels. We usually say that a pixel is at location (i,j) when it is located at row i and column j, or if you prefer horizontal location i and vertical location j.
The pixel location (0,0) is at the upper left corner of the image. A 4 by 4 image would have the indices
as follows:
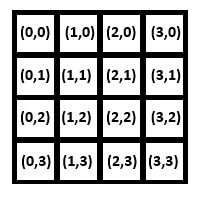
The content of each component of the 4x4 iumage would be a color, an (R,G,B) value. Let's look at color now, so we can better understand a pixel. The same 4x4 image might look like this:
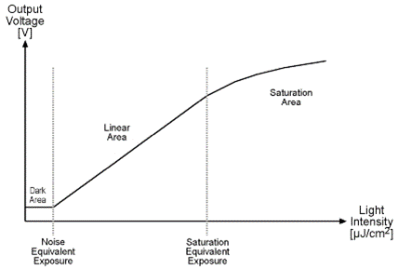
The index values begin at 0 because that's a convention in computer science. In an electronic, rather than a biological, vision system, a brighter light causes a current (or voltage) to be generated by a sensor, and the brighter the light is the more current is produced. There must obviously be some upper limit J to the current that can be produced, and beyond that the device cannot respond to brighter lights. Similarly the smallest current the device can produce is zero at a light intensity I, and any amount of light smaller than that won’t be detected. Different devices have different minimum and maximum light levels and different amounts of current they can produce.
Another important question concerns the degree to which a change in light intensity is reflected in a change in current or voltage. If the light intensity changes by 1% does the current change by 1%? What is the smallest change in light intensity that causes a change in current? Is that change in intensity the same at low light intensities as it is a high ones? The figure below shows a graph of light intensity VS voltage for a device. What it shows is that there is a range of illumination for which the device is designed to function properly. Less light than that and the result is no response (black), and more light means that the maximum value will be recorded (white), which is called saturation. This response changes from device to device and the response also changes due to external factors such as temperature.
Cameras are designed to produce images for human beings, and so they are designed to produce a red, green, and blue brightness value for each pixel location. A color value can be represented as a percentage of the maximum possible red, green, and blue value, in which case it’s usually a value between 0.0 and 1.0. More often it is represented as a number between 0 and the maximum possible value, which is often 256 This allows a total of 224 or 16,777,216 different numerical values (distinct colors), but there are still colors that can’t be represented. Colors form a continuum – a color is a frequency of light, and between any two colors there is another one. This means that any image is only an approximation of reality, a fact that artists already know. The number of distinct colors or grey values that are possible in a particular system is referred to as the quantization level.
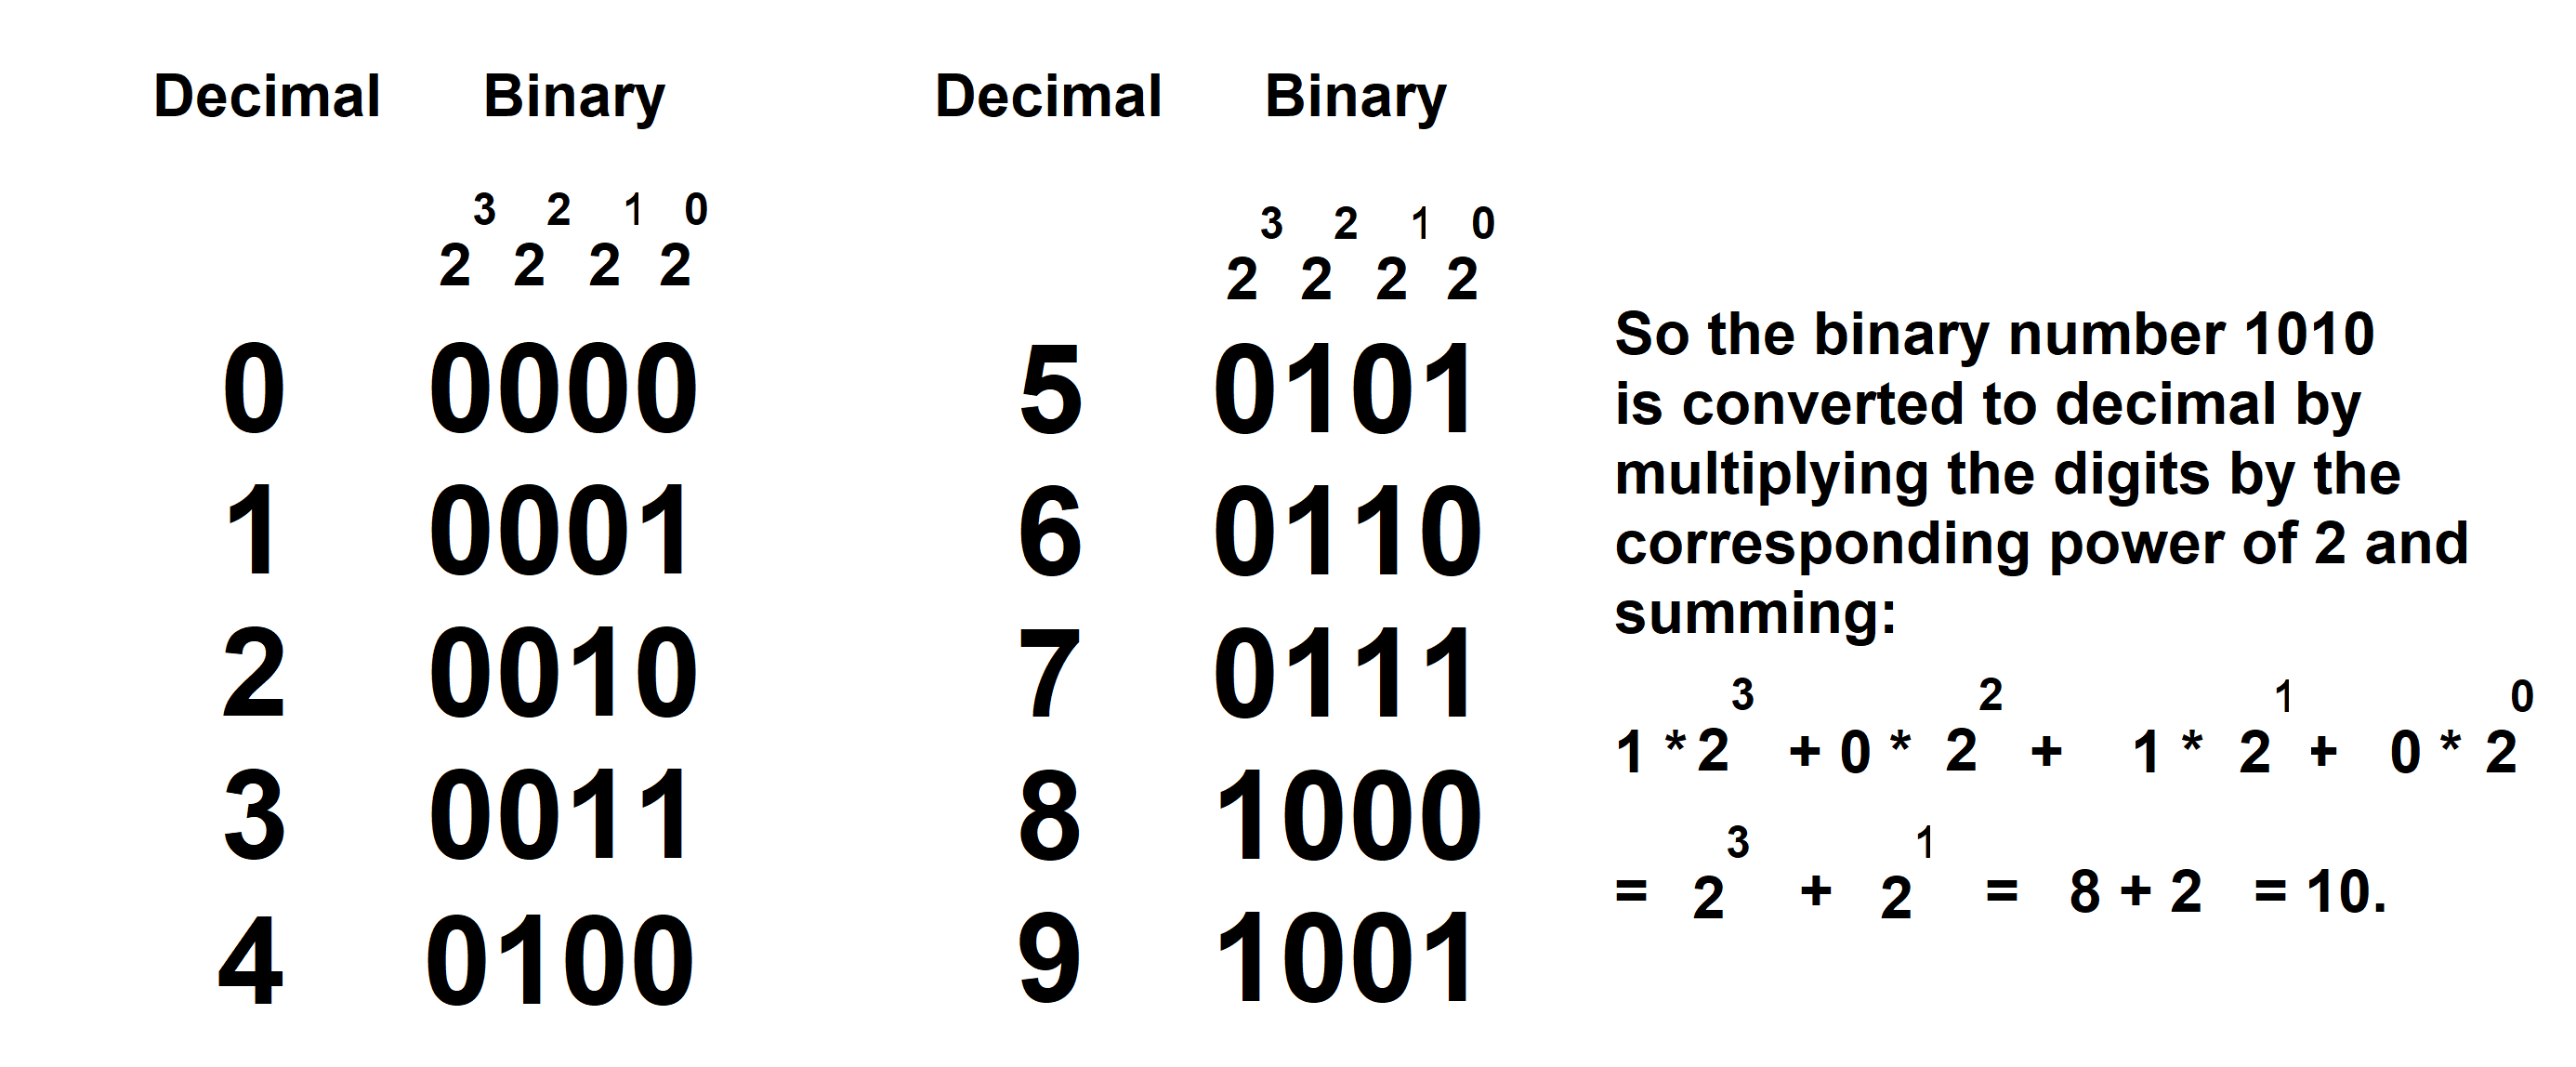
Values between 0 and 256 can be represented by using 8 binary digits, or bits.
Binary??
Binary numbers use only the digits '0' and '1', and are how numbers are stored on nearly all computers. The number 0 is represent as '0', and the number 1 is represented as '1'. The number 2 is represented as '10', wich is 1*2 + 0, and 3 is '11' which is 1*2+1. Each binary digits is a 0 or 1, and represents a power of 2: these are 1 (=20 ), 2 (=21 ), 4 (=22), 8 (=23), 16 (=24), 32 (=25) and so on. An 8-bit color gives 256 = 28 different levels. A 4-bit quantization gives 24, or 32 levels. For human vision, 8 bits of quantization is sufficient.
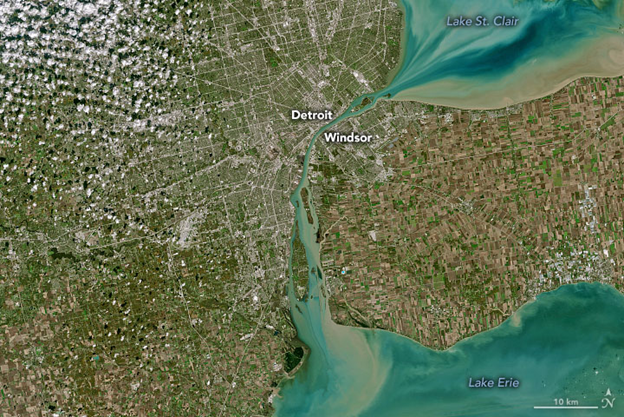
The other important aspect of images is resolution. This term is used in confusing ways. To many it means the size of the image in pixels – a megapixel, or 1000x1000 pixels, is an example when used to describe the image generated by a camera. It says there are 1000 columns of 1000 rows of pixels. However, resolution can also refer to the level of detail available in the image, or the minimum distance that can be observed between two points. A satellite can have a 1 meter resolution, meaning that it can discern objects down to 1 meter by 1 meter in size. A microscope could have a resolution of 1 micron (1 millionth of a meter), which defines the smallest object that it can see. Both images could have the same number of pixels, which is where the confusion occurs. An image with more pixels might or might not have more detail – it may simply be larger.
All of the detail within the smallest area that can be seen is avereaged into one color or brightness value. The size of the image is 5000x5000 pixels. The same applies to images of small things – resolution could be measured in millimeters or microns.
Once an image is acquired, the resolution can’t be improved. A blurry image can be sharpened, but the sharper image is an estimate of what the actual pixels might have been. Sharpening is done for visual improvement, not to gain more data. If an image is made larger, what happens is that we make the existing pixels bigger. Increasing the size from 500x500 pixels to 1000x1000 pixels really means that each pixel in the original becomes four pixels in the new image. We can only expand what we already have. And if that’s not confusing enough, resolution can reference the density of pixels – the number of pixels per inch (PPI). Let’s look at this using a small image.
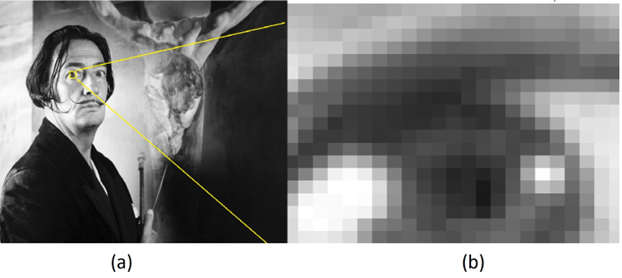
Consider the image above. The portion of this image surrounded by the yellow rectangle was expanded 50 times, and is shown on the right. We can see in the expanded image that the pixels are squares, and that each square has a uniform grey value. If the entire original image were expanded in the same way it would be 45000 x 22500 pixels, giving a total of 1.5 billion pixels (gigapixels). The original is about 150 pixels per inch, the expanded one would be about 3 PPI or would require 25 inches to print at the original resolution. Printing and scanning processes make it hard to determine resolution sometimes. For example, for example the Dali image displayed above is not the same physical size as the photo that was captured, and the grey values will differ a bit from the original as well.
The computer language Processing was designed for artists to use for implementing their algorithms. It is a variation of the Java language, and allows an artist to write code into a window on their screen that will display an image in another window. Drawing is very simple when using processing, but is quite difficult in Java since there is a lot of overhead involved in doing computer graphics in a PC window.
There are many web sites and books that can help you learn the many details involved in Processing programming.
The important thing right here is that Processing has images built in to its structure. There is something
(what we call a type) called a PImage that can hold an image. We can state that a particular name
( a variable ) will contain an image in a declaration such as:
PImage myImage;
This says that the name myImage represents an image in our program, any image we like, and contains all
pixels and supplementary information we could need. An image is really just a two-dimensional collection of pixel
values as we have seen, and most languages all use a 2D array of numbers for this purpose. Processing
"understands" that a PImage contains pixels, and offers operations that are specifically intended for images,
such as reading one from a file, displaying it on the screen, and so on.
We can read an image from a file as follows:
myImage = loadImage (“imagefile.png”);
where the image being read in has the name imagefile.png, which is in quotes. The loadImage operation
can read most common types of image, and identifies them using the suffix portion of the file name. So, we can also
save an image in a file:
myImage.save (“output.jpg”);
where the suffix defines the type of image file that will be created.
Accessing individual pixels in an image is done by specifying the x and y coordinates of the
pixel using the get operation:
Processing is a full featured programming language, and it adds a lot of additional functionality
for creating art: it creates a region of the screen where drawing is done, displaying and saving images
is easy, drawing shapes and colors anywhere in the drawing area is simple, it offers 3D graphics, and there
are libraries for video and sound. The program that draws a circle is only one single line of code, which
is remarkable. Appendix II provides a more complete summary of the language.
There is a confusion between this and generative AI, unfortunately. An AI system is not really
under the control of the artist, nor does the artist define an algorithm. AI systems such as Midjourney
and NightCafe only allow the user to specify a request by using a simple phrase. This is essentially
what someone might do when hiring an artist, but is certainly not an algorithm.
Generative art is not a movement or a style. A style would permit a positive assessment of a work as
belonging (or not) to a particular class or genre on inspection. It would involve visual elements, for example,
and characteristic image transformations that would allow works to be classified. Generative art is more about
how it is made. In that sense it can be thought of as constructivist, which is about how the
materials used to make the art behaved. How is plastic different from steel, and glass distinct from stone?
In constructivism, the form taken by an artwork is defined by its materials, and not the reverse.
An artist often takes materials like oil and tints and creates painted renderings, transforming the raw material
into a painting or drawing or sculpture.
The basic ideas around generative art are as follows:
As I said before, a generative artist does not need to be a programmer, but it certainly helps. The ability to
specify what the artwork should look like and how to create it ultimately must be specified in terms that a
computer or like device can execute. That’s why we need to know about pixels, and computer defined (RGB) colors,
and randomness. Visual artists have not traditionally used algorithms in their work. They have often used
design components like visual studies, but that’s very different.
Hamlet is an algorithm. The words are all there and mean the same thing to most of us, but there are
thousands of different performances. We can ask who is the best Hamlet? Richard Burton? Laurence Olivier?
Benedict Cumberbatch? The fact that this question is even asked means that there are differences between them,
and they are differences in execution. There is a degree of randomness in the performances also.
Visual art has not historically had use of algorithms in this way. A painter can have a process, but that’s
individual to a painter and is not really an algorithm. For one thing a process is more like a style in that
it is not about a specific artwork, but is in fact about the artist. All of the works by an artist show the
same process at work: individual pieces are not described by the process.
Generative art is definitely art in the usual sense of the word. Art is a way that humans communicate
feelings to each other. The artist has complete control over the final work, and at a detailed level.
Machines have assisted artists in rendering, and really that’s what a computer does for us. Because
generative art is still art, the usual characteristics of art still apply. In particular, the traditional
seven elements that we learn in art school are still essential: line, value, color, shape, form, texture,
and space. We will discuss each of these in the context of generative art, and then add an eighth element:
motion.
c = myImage.get(i,j);
The name c represents a variable that has the type color, which is another convenient thing that
Proccessing adds:
color c;
because a pixel is a color. It is represented as a number, and a color is another name for an integer,
which is just a number with no fractional part. Setting a pixel value is done using set:
set (x, y, c);
where (x,y) is the location of the pixel and c is the color.
Displaying an image on the screen is also veary easy in
image (myImage, x, y);
will display the image with the upper left corner placed at location (x,y) in the display area.
A complete program that reads and display an image is:
// Code: file  ‘l01display.pde’
//    Algorithm: display1 -  Display an image.

PImage myImage;                        Declare the image variable

myImage=loadImage(“imagefile.png”);    Read the image from a file named “imagefile.png”
image (myImage, 0, 0);                 Display the image on the screen
The result of this program is:
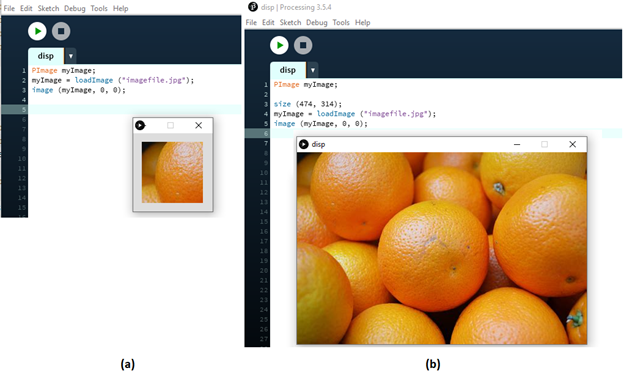
Image displayed by our first program.
The image displayed initially, on the left, is is a window that is too small, because we did not specify
what size it should be. The default is only 100x100 pixels. Adding a size specification allows us
to draw into canvases of any size we like. The image of the right was created by the program:
//  Code: file  ‘l02display.pde’
//  Algorithm: display2  -Display an image, correct size.
PImage myImage;                       // Declare the image variable

size (474, 314);                      // Define the size of the display area to be 474 x 314
myImage=loadImage(“imagefile.png”);   // Read the image from a file named “imagefile.png”
image (myImage, 0, 0);                // Display the image on the screen
The following operations (functions) are provided by Processing and are very useful when using images:
myImage.width()	        - The width in pixels if the image.
myImage.height()        - The height in pixels of the image.
createImage (x, y, RGB) - Create a new RGB image of size x by y pixels.
red(p)		        - Where p is a pixel (color) give the value of the
			   red component, between 0 and 255.
green(p)		- Where p is a pixel (color) give the value of the
			   green component, between 0 and 255.
blue(p)		        - Where p is a pixel (color) give the value of the
			   blue component, between 0 and 255.
brightness(p)	        - Where p is a pixel (color) give the value of the
			   Grey level or brightness, between 0 and 255.
color(r, g, b)		- Give a pixel (color) value having the color
			  values red=r, green=g, and blue=b where each
		          value is between 0 and 255 inclusive.
Set An Image To Green
This example assumes you can do some coding and/or have examined some of the material on the internet
or in Appendix II of the book. Setting an image to one color means changing each pixel, one by one, to
that color. Each pixel is accessed using a horizontal index x and a vertical index y. We can set one
pixel at (x,y) to green using the code:
myImage.set(x,y, color(0,255,0));
The color represented by (0,255,0) has only green in it, and the maximum possible amount of green.
We could set each pixel this way:
myImage.set(0,0, color(0,255,0));
myImage.set(0,1, color(0,255,0));
myImage.set(0,2, color(0,255,0));
       . . .
And so on. This would be tedious, so we use what programming languages call a loop:
for (x=0; x<myImage.width; x=x+1)
myImage.set(x,0, color(0,255,0));
This specific loop steps through all values of x between 0 and the width of the image,
and sets the pixel at (x, 0) to green. That’s only the first row, though. We need to do all rows:
for (x=0; x<myImage.width; x=x+1)
for (y=0; y<myImage.height; y=y+1)
myImage.set(x,y, color(0,255,0));
Now all pixels in the image are green. If we display it, we can see that is true. The complete program is:
// Code: file ‘l03setgreen.pde’
// Algorithm: setgreen – Set all pixels in an image to green
PImage myImage;
int x, y;
myImage = createImage (200,200, RGB); // Create a PImage named myImage that is 200x200 pixels
for (x=0; x<myImage.width; x=x+1) // For each horizontal pixel (column)
for (y=0; y<myImage.height; y=y+1) // and for each vertical pixel (row)
myImage.set(x,y,color(0,255,0)); // Set pixel at (x, y) to green
image (myImage, 0, 0); // Display this image
Drawing Things
Drawing something in an image pixel by pixel is both tedious and non-intuitive. Individual pixels are too
small; they make sense as an object only as a collective. Also, artists use basic shapes when constructing
a scene. It makes sense that Processing (or any computer graphics code library) would have drawing
operations for shapes in addition to pixels.
Lines
A line is drawn between two pixels like this:
line (x0,y1, x1,y1);
It draws a line between pixels (x0,y0) and (x1,y1) by setting the pixels between them to a specified color.
The default color is white. The color used to draw lines is set using the function stroke. For example:
stroke ( color(200,0,0) );
sets the line color to red, in this case. The thickness of the line, in pixels, is set using:
strokeWeight ( k );
where k is the line thickness in pixels.
Circles
A circle is drawn using the location of its center and its diameter which is double the circle’s radius:
circle (x, y, 6);
This draws a circle at location (x,y) with a diameter of 6 pixels using the current stroke color and thickness.
There is a fill color that is used to color the inside of objects, and that is set using fill:
fill ( color(0,200,0) );
which will result in all circles and other objects being filled with the specified color, in this case green.
The default is to have white as the fill color, and we can have no fill color using the call:
noFill();
There will be a line drawn around the circle if the stroke color is set, or not if it is not set. The call:
noStroke();
will result in no line drawn around objects.
Ellipses
An ellipse can be thought of as a variation of a circle. It has a center and a width and height, but the
width and height can differ:
ellipse (x, y, wid, ht);
Again, it can be filled or not, have an outline or not. The (x,y) values refer to the upper left corner
of the ellispe, not its center.
Rectangles
We all know what rectangles are. They have a location, which in this case is the upper left corner of the rectangle,
and a width and height. Again, it can be filled or not, have an outline or not.
Examples
In the image below we can see examples of all of the basic shapes we’ve described.
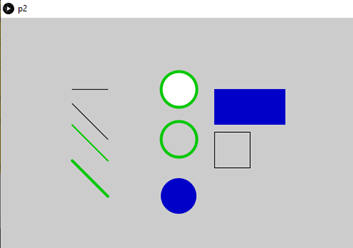
Basic shapes we can draw with Processing.
The program that draws them is:
// Code: file  ‘l04shapes.pde’
// Algorithm: shapes – Draw all of the shapes in the image above
    size (900, 600);               // Set the drawing area to 900x600 pixels
    stroke (0,0,0);                // Set line drawing color to black (0=black)

    line (100,100, 150, 100);      // Black line from (100,100) to (150, 100)

    line (100,120, 150,170);       // Draw 45 degree line from (100,120) to (150,170)
    stroke (0,200,0);              // Change line color to green = (0,200,0)
    strokeWeight (2);              // Change line thickness to 2 pixels

    line (100,150, 150,200);       // Draw  2 pixel wide green line from (100,150)
                                   //  to  (150,200), or 45 degrees.
    strokeWeight (4);              // Change thickness to 4 pixels

    line (100,200, 150,250);       // Draw 4 pixel wide green line from (100,200)
                                   //  to (150,250), or 45 degrees.
    circle (250, 100, 50);         // Draw green circle, default fill, at (250,100)
                                   //  radius 25.
    noFill ();                     // Turn off filling.
    circle (250, 170, 50);         // Draw green circle, no fill, at (250,170)
                                   //  radius 25.
    fill (0,0,200);                // Fill with blue = (0,0,200)
    noStroke();                    // Turn off stroke (outline) drawing
    circle (250, 250, 50);         // Draw a blue filled circle at (250,250)
                                   //  radius 25
    rect (300,100, 100, 50);       // Draw a blue rectangle width=100 height=50
                                   // with upper left at (300,100) line thickness 4
    stroke (0);                    // Set line color to black.
    noFill ();                     // Turn off filling
    strokeWeight (1);              // Set line thickness to 1 pixel
    rect (300,160, 50, 50);        // Draw rectangle (a square) width=height=50 pixels
                                   // where upper left is (300,160), unfilled.
Generative Art
The term generative art refers to art that is created using an autonomous (usually non-human)
system under the algorithmic control of the artist. That’s quite a mouthful, but it almost always
means that an idea developed by an artist is broken down into methodological steps (an algorithm)
and then a computer (autonomous system) is programmed to perform those steps. The human effort occurs
in the design of the work, while the ‘autonomous’ part occurs during the rendering process.
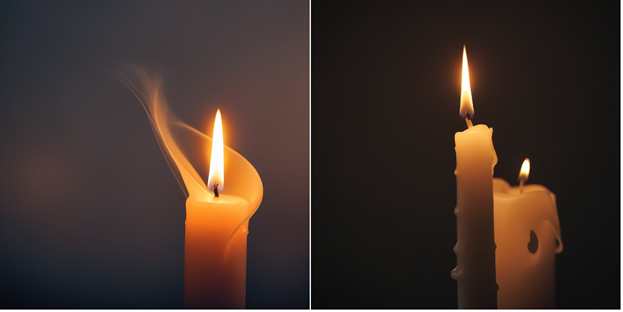
AI Generated images using the prompt "Candle in the wind".
The images above were generated using the phrase “candle in the wind”. The images are very pleasant, but not
necessarily what the artist had in mind, and were certainly not under the control of the artist, and so are
less interesting to artists specifically.
Algorithms in The Arts
Musicians are somewhat used to algorithms: written music is an algorithm. It’s true that you can try to play a
musical piece precisely as written, but generally each performance will be a variation on the score. That’s why
there are so many recordings of the same musical piece. For example, the best performance (instance) of Beethoven’s
Symphony No. 7 is said by some to be DG E471 4902 by the Berlin Philharmonic conducted by Claudio Abbado.
Second best could be Decca 478 3496 by the Leipzig Gewandhaus Orchestra conducted by Riccardo Chailly. They are
the same symphony (algorithm), but the two instances are distinct from each other in their realization or
performance. There is a degree of randomness in the performances as well.
Generative Art Design
There are many ways to think about the creation of art, and specifically the creation of generative art.
A key question is “Where do we begin”. Here are some ideas.
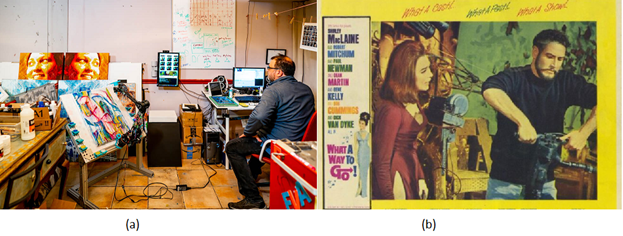
What A Way To Go.
References
Special reference:
John Berger (1972) Ways of Seeing, Penguin Books, UK.
This is a seminal work that changed who many people viewed art. It is based on a television series
consisting of four-30 minute episodes that was created as a response to the British Civilization series.
This book is a must read, but at least watch the videos. These could be found in December of 2024 at:
Youtube video
Andrew Dixon (2018). Art: The Definitive Visual Guide, New Edition. DK; 2 edition. ISBN-13: 978-1465474759
Norman Koren (2007). Introduction to Resolution and MTF Curves,
Online link.
Micael F. Marmor (2006). Ophthalmology and Art: Simulation of Monet's Cataracts and Degas'
Retinal Disease, JAMA Opthamology, 124(12):1764-1769.
J. R. Parker (2010) Algorithms for Image Processing and Computer Vision, Wiley; 2 edition,
ISBN-13 : 978-0470643853
M. Pearson, M (2011) Generative Art: A Practical Guide Using Processing. Manning Publications; 1st edition.
L. Zhaoping (2014) Understanding Vision: Theory, Models, and Data, Oxford University Press,
https://doi.org/10.1093/acprof:oso/9780199564668.001.0001
Tools
RGB Color chart
Computer vision Art Gallery
Download Processing
Midjourney AI
Craiyon AI
Library
display image without size
display image with size
set all pixels to green
draw the shapes